Introduction: Why You Need an Image Resizer 🔗
In today's visual-first digital landscape, images are everywhere. From website headers to social media posts, product photos to email newsletters, the right image size can make or break your content's effectiveness. Yet, one of the most common challenges faced by designers, marketers, and everyday users is getting images to fit perfectly where they're needed.
Did you know that websites with properly optimized images load 2-3 seconds faster than those with oversized images? Or that social media posts with correctly sized images receive 94% more views than those with improperly formatted visuals? With over 3.2 billion images shared daily across the internet, image sizing has never been more critical.
Enter the image resizer—your essential tool for adjusting image dimensions, optimizing for different platforms, and ensuring your visuals always look their best, no matter where they appear.
What is an Image Resizer? 🔗
An image resizer is a tool that changes the dimensions of digital images—either by scaling them up (enlarging) or scaling them down (reducing). Unlike simple cropping, which removes portions of an image, resizing maintains the entire image while adjusting its width and height proportionally or to specific dimensions.
Key Concepts in Image Resizing 🔗
1. Resolution 🔗
Measured in pixels (width × height). Common resolutions:
- Web images: 72-96 DPI
- Print images: 300+ DPI
- Social media: Platform-specific dimensions
2. Aspect Ratio 🔗
The proportional relationship between width and height:
- 1:1 (Square): Instagram posts, profile pictures
- 4:3: Standard digital camera photos
- 16:9: Widescreen, YouTube videos
- 3:2: Traditional photography
3. Image Quality 🔗
Resizing affects quality differently:
- Downscaling: Reduces file size, generally preserves quality
- Upscaling: Increases pixel count, may cause blurriness
4. File Format Impact 🔗
Different formats handle resizing differently:
- JPEG: Lossy compression, good for photos
- PNG: Lossless, preserves transparency
- WebP: Modern format, excellent compression
- SVG: Vector, infinitely scalable
Why You Need an Image Resizer 🔗
🌐 1. Website Performance 🔗
Image size directly impacts loading speed:
- 1MB images can increase load time by 2-3 seconds
- 50% of users abandon sites taking over 3 seconds to load
- Optimized images improve Core Web Vitals scores
- Better SEO rankings from faster load times
📱 2. Social Media Optimization 🔗
Each platform has ideal dimensions:
| Platform | Ideal Image Size | Aspect Ratio | |----------|-----------------|--------------| | Instagram Feed | 1080 × 1080 px | 1:1 | | Instagram Story | 1080 × 1920 px | 9:16 | | Facebook Post | 1200 × 630 px | 1.91:1 | | Twitter/X Post | 1600 × 900 px | 16:9 | | LinkedIn Post | 1200 × 627 px | 1.91:1 | | Pinterest Pin | 1000 × 1500 px | 2:3 | | YouTube Thumbnail | 1280 × 720 px | 16:9 |
An image resizer ensures your visuals match these specifications perfectly.
🛍️ 3. E-commerce Requirements 🔗
Product images need consistency:
- Amazon: 1000 × 1000 px minimum
- Etsy: 2000 × 2000 px for zoom functionality
- Shopify: 2048 × 2048 px for high resolution
- eBay: 1600 × 1600 px optimal
📧 4. Email Marketing 🔗
Email clients have size constraints:
- Gmail: Truncates images wider than 600px
- Outlook: Poor rendering for large images
- Mobile email: Optimized for 320-600px width
- Load time: Images under 1MB recommended
🖨️ 5. Print and Publishing 🔗
Print requires specific dimensions:
- Business cards: 3.5 × 2 inches (1050 × 600 px at 300 DPI)
- Flyers: 8.5 × 11 inches (2550 × 3300 px)
- Banners: Large format with specific ratios
- Photo prints: 4×6, 5×7, 8×10, etc.
How to Use Our Image Resizer: Step-by-Step Guide 🔗
Our free online image resizer makes dimension adjustment simple and precise:
Step 1: Access the Tool 🔗
Visit our Image Resizer Tool - completely free, no registration required.
Step 2: Upload Your Image 🔗
- Drag and drop image into upload area
- Click to browse from your device
- Supports JPG, PNG, WebP, GIF, BMP, and TIFF
- Maximum file size: 50MB
- Batch resize: Up to 20 images at once
Step 3: Choose Resize Method 🔗
Method A: Preset DimensionsSelect from common presets:
- Social Media: Instagram, Facebook, Twitter, LinkedIn
- Web: Thumbnail, Standard, Large, Banner
- Print: 4×6, 5×7, 8×10, A4, Letter
- Custom: Save your own presets
- Width and Height: Enter exact pixels
- Percentage: Scale by percentage (50%, 75%, etc.)
- Maintain aspect ratio: Lock proportions
- Ignore aspect ratio: Stretch to exact dimensions
- Set width: Height auto-calculates
- Set height: Width auto-calculates
- Set max dimension: Largest size limit
Step 4: Advanced Options 🔗
Resize Quality Settings:- High Quality: Best for print, larger files
- Balanced: Good for web, moderate files
- Small File: Maximum compression, smaller files
- Preserve metadata: Keep EXIF data (camera info, location)
- Remove metadata: Strip for privacy, smaller files
- Auto-orient: Fix rotation based on EXIF
- Sharpen after resize: Enhance clarity for downscaled images
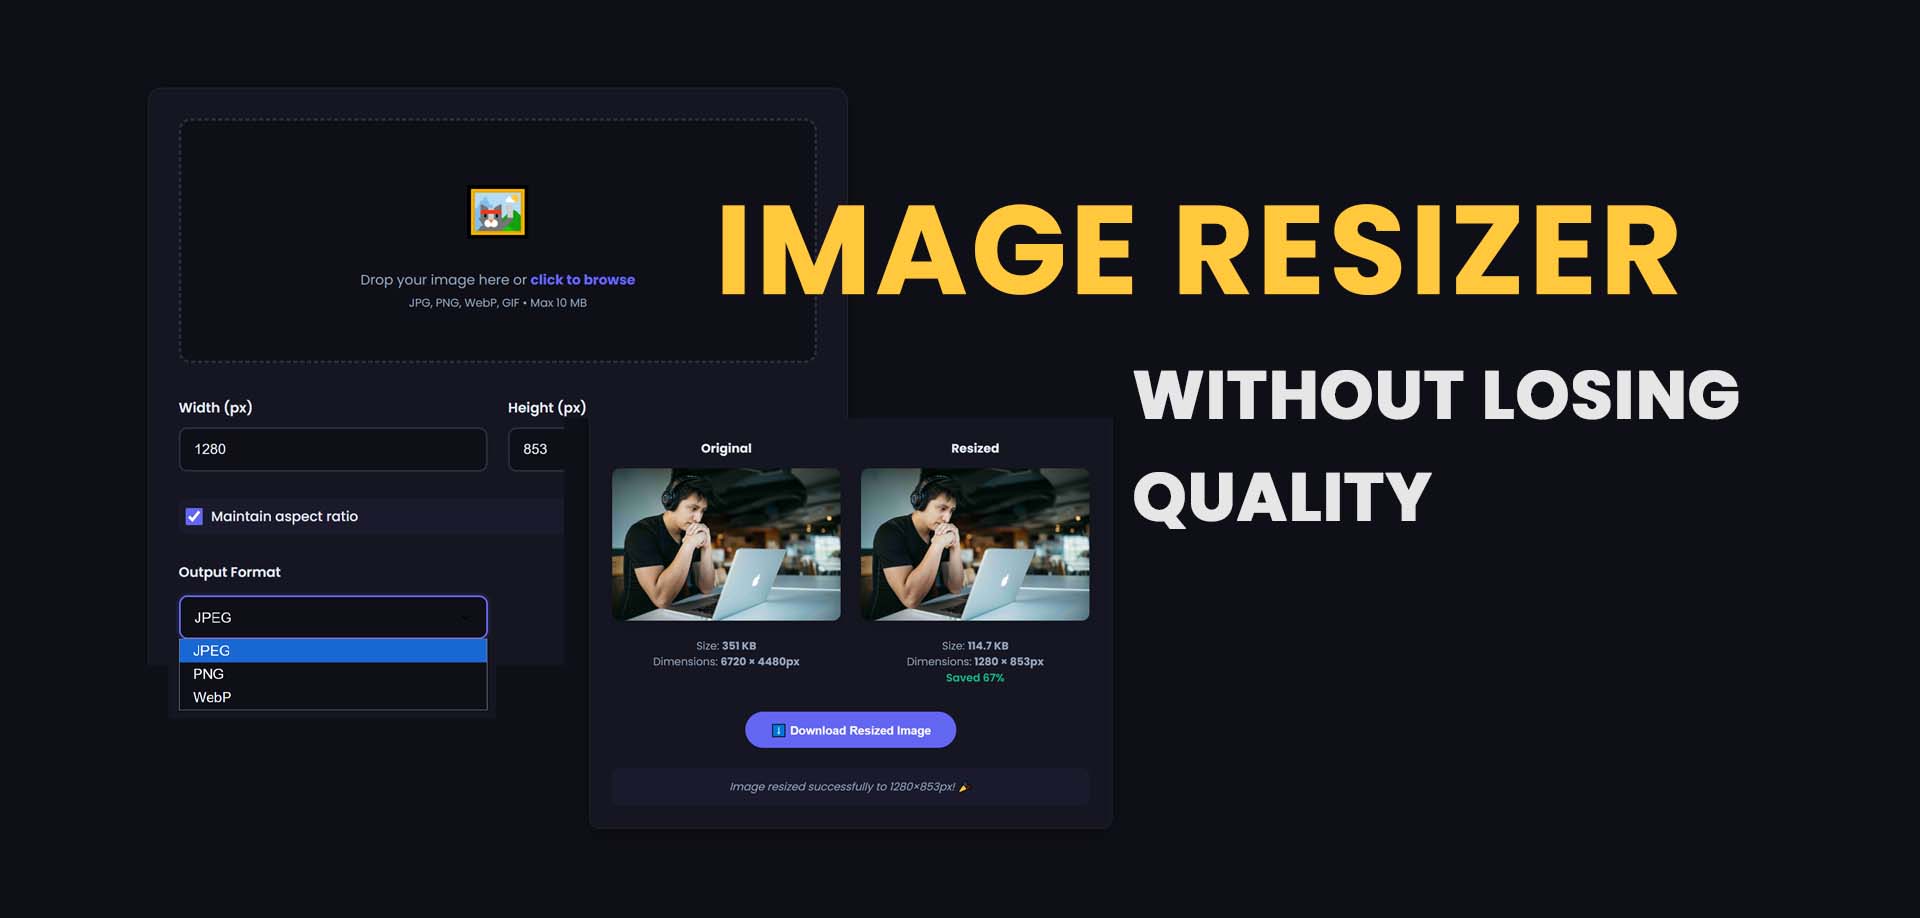
Step 5: Preview and Compare 🔗
- Side-by-side view: Original vs. resized
- Zoom functionality: Inspect details
- File size comparison: See savings
- Resolution check: Confirm dimensions
Step 6: Download Your Image 🔗
- Download individual images
- Download all as ZIP for batch resizing
- Choose output format: Original or converted
- Instant delivery: No waiting, no email required
Image Resizing Techniques 🔗
Downscaling (Reducing Size) 🔗
Best practices for reducing image dimensions:
1. Always maintain aspect ratio- Prevents distortion
- Use proportional scaling
- Most important for people, products, and logos
- Downscaling softens details
- Apply 10-20% sharpening
- Creates crisp, clear results
- EXIF data adds file size
- GPS coordinates pose privacy risks
- Strip for web optimization
- Photos: JPEG, quality 80-85%
- Graphics: PNG or WebP
- Logos: SVG or PNG with transparency
Upscaling (Enlarging Size) 🔗
Best practices for increasing image dimensions:
1. Start with highest quality source- Raw files preferred
- Minimum 300 DPI for print upscaling
- Avoid upscaling low-quality JPEGs
- Bicubic: Smoother enlargements
- Lanczos: Sharper details
- AI upscaling: Best for significant enlargements
- Upscaling cannot create missing detail
- 2× enlargement is generally acceptable
- 4×+ requires AI or vector conversion
- Logos and graphics as SVG
- Infographics as vector
- Text-heavy images as PDF
Batch Image Resizing 🔗
For efficiency with multiple images:
Use Case: Website Product Photos 🔗
- Upload 50 product images
- Set all to 800 × 800 px
- Maintain aspect ratio, crop to fill
- Output as WebP at 85% quality
- Download all as ZIP
Use Case: Social Media Campaign 🔗
- Upload 20 marketing images
- Create 3 versions: Instagram (1080×1080), Facebook (1200×630), Twitter (1600×900)
- Maintain original aspect ratio
- Add subtle watermark
- Organize by platform folders
Use Case: Email Newsletter 🔗
- Upload 15 images
- Resize all to max-width 600px
- Compress to under 200KB each
- Convert to JPEG at 80% quality
- Strip metadata for privacy
Platform-Specific Image Size Guide 🔗
Website Images 🔗
| Image Type | Recommended Size | Notes | |------------|-----------------|-------| | Hero/Banner | 1920 × 1080 px | Full width, optimized for mobile | | Thumbnail | 150 × 150 px | Square or 4:3 | | Blog Featured | 1200 × 630 px | Social sharing optimized | | Product Gallery | 800 × 800 px | Consistent square | | Background | 1920 × 1200 px | Large file, lazy load |
Social Media Images 🔗
| Platform | Post Type | Dimensions | |----------|-----------|------------| | Instagram | Feed Photo | 1080 × 1080 px | | | Feed Landscape | 1080 × 566 px | | | Feed Portrait | 1080 × 1350 px | | | Stories | 1080 × 1920 px | | | Reels | 1080 × 1920 px | | Facebook | Post | 1200 × 630 px | | | Event Cover | 1920 × 1080 px | | | Page Cover | 1640 × 856 px | | | Group Cover | 1640 × 856 px | | Twitter/X | Post | 1600 × 900 px | | | Header | 1500 × 500 px | | | Profile | 400 × 400 px | | LinkedIn | Post | 1200 × 627 px | | | Company Banner | 1536 × 768 px | | | Profile Banner | 1584 × 396 px | | Pinterest | Pin | 1000 × 1500 px | | | Board Cover | 600 × 600 px | | YouTube | Thumbnail | 1280 × 720 px | | | Channel Art | 2560 × 1440 px |
Image Resizer vs. Other Image Tools 🔗
| Tool | Primary Function | Best Use | |------|------------------|----------| | Image Resizer | Change dimensions | Web, social media, print sizing | | Image Compressor | Reduce file size | Email, website speed | | Image Cropper | Remove unwanted areas | Composition, framing | | Image Converter | Change format | Compatibility, optimization | | Image Editor | Edit content | Adjustments, effects, retouching |
Common Image Resizing Scenarios 🔗
Scenario 1: Website Header Image 🔗
- Original: 4000 × 3000 px (15MB)
- Goal: 1920 × 1080 px, under 500KB
- Process:
1. Resize to 1920 × 1080 px 2. Compress to 85% quality 3. Convert to WebP format 4. Result: 1920 × 1080 px, 280KB
Scenario 2: Instagram Feed Post 🔗
- Original: 6000 × 4000 px (8MB)
- Goal: 1080 × 1080 px, square format
- Process:
1. Resize to 1080 × 1080 px (crop to square) 2. Sharpen 15% 3. Output as JPEG at 90% quality 4. Result: 1080 × 1080 px, 180KB
Scenario 3: Email Newsletter Images 🔗
- Original: Various sizes (2-5MB each)
- Goal: Max 600px width, under 200KB
- Process:
1. Set width to 600px, auto height 2. Compress to 70% quality 3. Strip metadata 4. Result: 600px width, 80-150KB each
Troubleshooting Common Issues 🔗
Image Looks Blurry After Resizing 🔗
Causes:- Upscaling beyond source quality
- Over-compression
- Incorrect sharpening
- Start with higher resolution source
- Use AI upscaling for enlargements
- Apply 10-20% sharpening after resize
- Avoid saving as JPEG multiple times
Colors Look Different After Resizing 🔗
Causes:- Color profile mismatch
- Format conversion issues
- Compression artifacts
- Preserve color profiles (sRGB for web)
- Use PNG for graphics with solid colors
- Avoid excessive compression
File Size Still Too Large 🔗
Solutions:- Reduce dimensions further
- Increase compression
- Convert to WebP format
- Remove metadata
- Use lossy compression for photos
Aspect Ratio Distortion 🔗
Solutions:- Always maintain aspect ratio
- Use "crop to fill" instead of stretching
- Set background color for non-proportional fits
Image Resizing Best Practices 🔗
For Web: 🔗
- Resize to exact display dimensions
- Use WebP format for modern browsers
- Keep files under 500KB for most uses
- Implement lazy loading for below-fold images
For Social Media: 🔗
- Follow platform dimensions exactly
- Test appearance on mobile devices
- Keep text within safe zones
- Use high contrast for visibility
For Print: 🔗
- Resize to 300 DPI minimum
- Use CMYK color profile
- Keep original files as backup
- Request proofs before bulk printing
For Email: 🔗
- Max width 600px
- Keep total email under 1MB
- Use inline styles for responsiveness
- Test across email clients
Frequently Asked Questions 🔗
Does resizing an image reduce quality? 🔗
Downscaling (making smaller) generally preserves or improves perceived quality. Upscaling (making larger) can reduce quality as it creates new pixels through interpolation.
What's the best image format for resizing? 🔗
For photos: JPEG or WebP. For graphics with text: PNG or SVG (vector). WebP offers the best balance of quality and file size for most uses.
Can I resize images without losing transparency? 🔗
Yes! Use PNG or WebP formats which support transparency. Our image resizer preserves transparency when you maintain the same format.
How do I resize multiple images at once? 🔗
Use our batch resize feature. Upload up to 20 images, set your dimensions once, and download all resized images as a ZIP file.
What's the difference between resizing and cropping? 🔗
Resizing changes the entire image's dimensions while keeping all content. Cropping removes portions of the image to focus on a specific area.
Can I resize images for print? 🔗
Yes! For print, resize to your target dimensions at 300 DPI. Use the print presets or enter custom dimensions in inches or centimeters.
Will resizing affect my image's DPI? 🔗
When resizing for web, DPI is irrelevant (only pixel dimensions matter). For print, our tool maintains DPI based on your dimension input.
The Future of Image Resizing 🔗
AI-Powered Resizing 🔗
- Content-aware scaling: Preserves important objects
- Intelligent upscaling: Creates realistic detail
- Automatic optimization: Platform-specific sizing
Responsive Image Delivery 🔗
- Automatic format selection: WebP, AVIF, JPEG based on browser
- Device-aware sizing: Mobile, tablet, desktop variants
- Network-aware quality: Faster delivery on slow connections
Cloud-Based Processing 🔗
- Server-side optimization: Faster, scalable
- CDN integration: Global delivery
- Real-time resizing: On-demand generation
Conclusion: Master Your Image Workflow 🔗
An image resizer is an essential tool for anyone working with digital images. From optimizing website performance to ensuring social media posts look perfect, proper image sizing saves time, improves user experience, and enhances your professional presentation.
By using our free image resizer, you can:
- Optimize images for any platform instantly
- Save storage space with appropriate dimensions
- Improve loading speed for websites and emails
- Maintain quality with intelligent resizing algorithms
Whether you're a web designer, social media manager, e-commerce seller, or casual user, our image resizer gives you the control and precision you need to make your images look their best, every time.
Ready to resize your images? Try our image resizer tool now and see the difference perfect dimensions can make.---
Resize your images now: Start optimizing your visuals →