
Table of Contents
Converting a PNG image to JPG often results in visible quality loss. The sharp edges become blurry, colors shift slightly, or the entire image appears "soft." This happens for specific technical reasons, but with the right approach, you can minimize or eliminate quality degradation entirely.
This guide explains exactly why PNG to JPG conversion affects quality, what settings preserve the most detail, and how to convert your images while maintaining visual fidelity.
Why PNG to JPG Quality Loss Happens
PNG and JPG are fundamentally different formats. Understanding these differences is the first step toward preserving quality during conversion.
Lossless vs Lossy Compression
PNG uses lossless compression. Every pixel of the original image is preserved exactly as it was created. When you save a PNG, you can reopen it, edit it, and save it again without any degradation.
JPG uses lossy compression. The format discards visual information that the human eye is less likely to notice, reducing file size at the cost of some detail. When you save a JPG, the encoder analyzes the image and decides which data to keep and which to throw away. Higher quality settings preserve more data. Lower quality settings discard more.
The conversion from PNG to JPG is therefore a transition from lossless to lossy compression. Some visual fidelity is always sacrificed, but the extent of that sacrifice depends entirely on the settings you choose.
Transparency and Alpha Channels
PNG supports transparency through an alpha channel — each pixel can have varying levels of opacity. JPG does not support transparency. When you convert a PNG with transparent areas to JPG, the converter must fill those areas with a solid color.
Most converters use white as the default background color. This is why transparent PNGs often appear with white backgrounds after conversion. If the original image had soft edges or anti-aliasing, the background color choice can create visible artifacts along the edges.
Color Profiles and Depth
PNG supports more color depth options than JPG, including 48-bit TrueColor and 16-bit grayscale. JPG typically uses 24-bit color (8 bits per channel). Converting a high-color-depth PNG to JPG can cause slight color shifts, particularly in gradients and subtle color transitions.
Best Quality Settings for PNG to JPG Conversion
The settings you choose during conversion directly determine the final quality. Here's what each setting controls and which values preserve the most detail.
Choosing the Right Quality Percentage
JPG quality settings typically range from 0 to 100. Higher numbers mean higher quality and larger files. Lower numbers mean smaller files but more artifacts.
For professional-quality conversions, use settings between 85 and 95. At 90+, the quality loss becomes nearly imperceptible while still reducing file size significantly compared to PNG.
Settings below 75 introduce visible compression artifacts, especially in areas with fine detail or smooth gradients. Avoid these settings when quality is the priority.
Resolution and DPI Considerations
DPI (dots per inch) affects print quality but does not impact screen display. However, the pixel dimensions of your image do matter. If you reduce pixel dimensions during conversion, you will permanently lose detail.
To maintain quality:
- Do not resize the image during conversion unless necessary
- If you must resize, use a high-quality resampling algorithm (bicubic or Lanczos)
- Keep the original pixel dimensions for web use
- Use 300 DPI only for print applications
Handling Transparency Properly
Since JPG does not support transparency, you need to choose a background color for transparent areas. The best practice depends on the intended use:
For web images: Match the background color to your website's background. This makes the transition seamless and avoids visible edges.
For product images: Use white for e-commerce and catalog applications.
For logos and graphics: Consider whether JPG is the right format at all — more on this below.
Step-by-Step Guide to Convert PNG to JPG
Here are the most reliable methods for converting PNG to JPG while maintaining quality.
Method 1: Online Converter
Online converters are the fastest and most accessible option. They require no software installation and work on any device.
- Open MiniToolsPro Image Converter — Navigate to the Image Converter tool.
- Upload your PNG file — Click the upload area and select your PNG image. Alternatively, drag and drop the file.
- Select JPG as the output format — Choose JPG from the format dropdown menu.
- Adjust quality settings — Set the quality slider to at least 85. For critical work, use 90 or higher.
- Configure background for transparency — If your PNG has transparent areas, select the appropriate background color.
- Convert and download — Click "Convert" and download your high-quality JPG image.
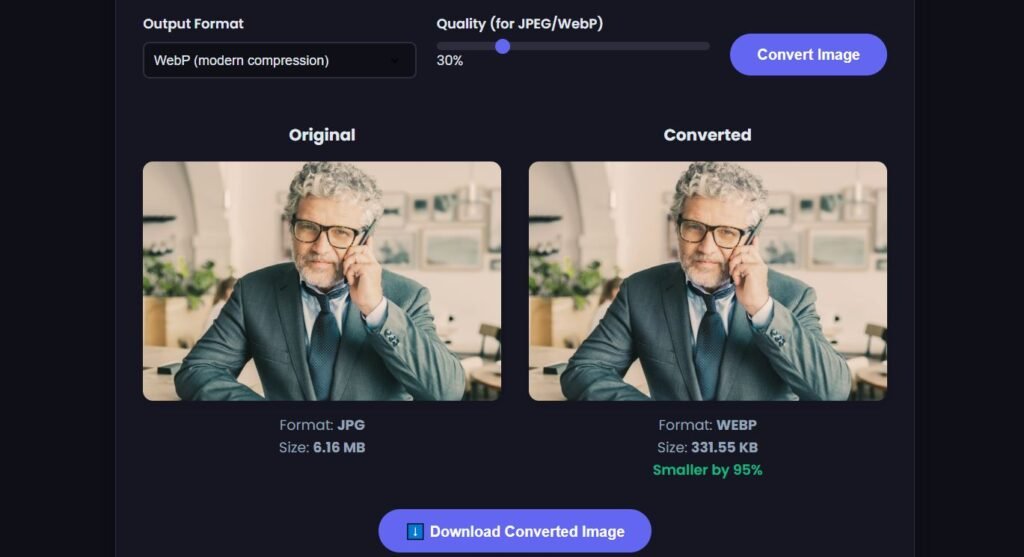
This method provides instant conversion with full control over quality settings.
Method 2: Desktop Software
Professional software like Adobe Photoshop, GIMP, and Affinity Photo offer advanced quality controls.
In Adobe Photoshop:
- Open the PNG file in Photoshop
- Choose File → Save As → JPEG
- Set quality to 10-12 (Photoshop's 0-12 scale, equivalent to 85-100%)
- Choose "Baseline Optimized" format
- Check "Embed Color Profile" for color accuracy
In GIMP (free):
- Open your PNG file
- Choose File → Export As → JPG
- Set quality to 85-95%
- Enable "Smoothing" at 0 for maximum detail
- Disable "Progressive" unless specifically needed
When NOT to Convert PNG to JPG
JPG is not the right choice for every situation. Here are scenarios where you should keep your image in PNG format or choose a different format entirely.
If you need smaller file sizes but want to preserve transparency or sharp edges, consider WebP instead. It supports transparency and generally offers better compression than JPG. For more on this, see JPG vs PNG vs WebP.
Common PNG to JPG Issues and Solutions
Even with proper settings, you may encounter specific problems. Here's how to address them.
Issue: Images appear "blocky" or pixelated
This is compression artifacts. Increase quality to 90+ or select a tool that offers custom quantization tables. Avoid multiple JPG saves on the same image.
Issue: Colors look wrong or washed out
Color profile mismatches are usually the cause. Ensure your converter or software embeds the sRGB color profile. This is the standard for web images.
Issue: White edges around objects
This happens when transparent areas are filled with white but the original used anti-aliasing. Try choosing a background color that matches the intended use context, or use a more sophisticated fill algorithm.
Issue: File is still too large
If quality is set high and the file remains large, consider reducing resolution slightly or using an image optimizer tool. For web use, you can also explore WebP or AVIF as alternatives to JPG.
For a deeper understanding of how conversion affects image quality across all formats, see Why Does Image Quality Change After Conversion.
When you need to convert your PNG to JPG, the MiniToolsPro Image Converter provides the fastest, most reliable way to maintain high quality. Simply upload your PNG, select JPG with quality above 85%, and download your optimized image. If you also need to reduce the resulting JPG file size further, consider using an online image compressor for additional optimization without noticeable quality loss.
Related Image Conversion Guides
Converting PNG to JPG can reduce file size, but the result depends on image content and compression settings. If you're converting other formats, see our guides to JPG to WebP, WebP to JPG, and JPG to PNG. For more information about what happens to image quality during conversion, read Image Quality After Conversion. You can also explore the complete Image Converter Guide.
Share this article 👇


0 Comments